


Tutorials
Audio Tutorials
rudiments audio and basic techniques for the production studio
Tutorials: #1 Technique of mixing drum beat
Francesco, the mastering engineer of Dirty Drop studio, shows his particular technique to craft a full-bodied and original sounding drum patterns,
using a hybrid combination of sequencers and hardware for an unusual Union between digital to analog!
video made before the preparation of the new studio Dirty Drop
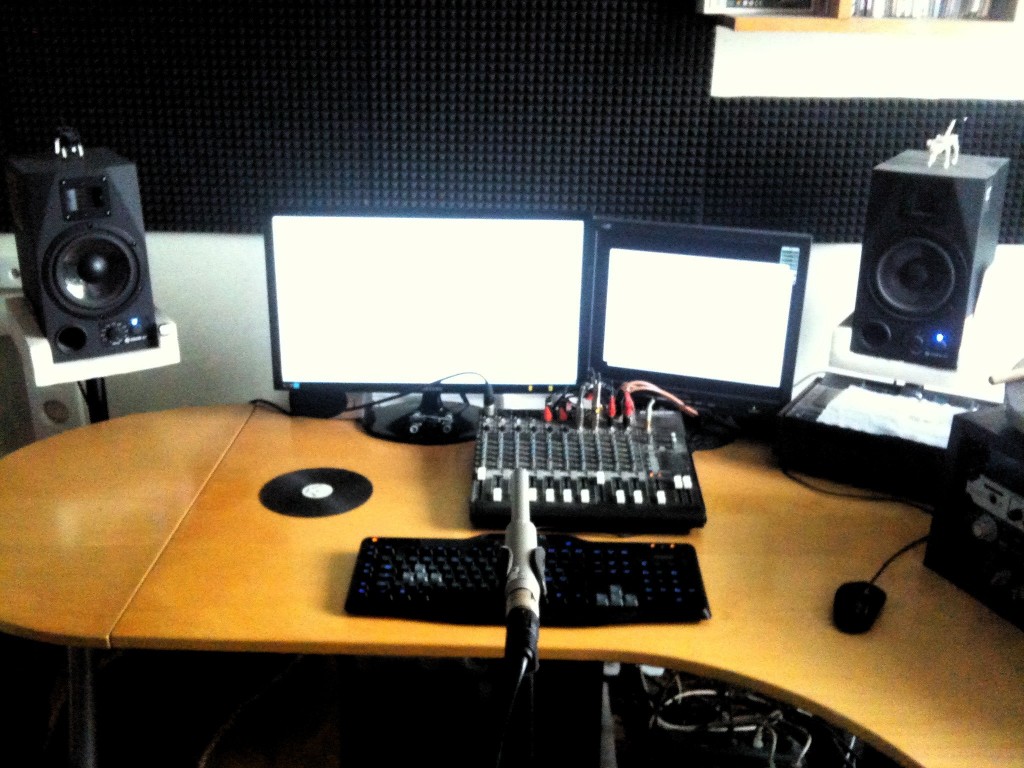
Tutorials: #2 acoustic measurement of its study and its frequency response
This short video shows how to measure frequency response LIVE
the recording studio or rehearsal room before moving to the sound.
CAUTION: mic should be placed on a pole in front of the 2 monitors / coffers
to form an equilateral triangle, which it is the ideal listening position.
It must also be in a position perfectly parallel to the floor and at the same height on the tweeters.
The mic will resume the Pink Noise generated by Room Eq that real-time display the actual acoustic response of the study.

Remember to set the 'Out dei vs monitors e l'Input del Mic in the preferences of the sound card.
If available load the mic calibration files and more sound card in Room Eq preferences.

For more in-depth analysis and measurement we will then proceed with the classic use of Eq Room
through its 'sweep' and the related charts and spectra.
For more detailed tutorials on how to set the software you can take a look at one of the many guides
on YouTube: Tutorial Room Eq .

necessary:
-
specific microphone to measurement (in this video it is used Behringer ECM8000)
-
mixer audio and / or audio card
-
Room Eq (specific software for audio measurement)
Tutorials: #3 mixing vocal parts
-
a- Reduce the sounds "S" (sibilants) using the DeEsser plugin. -
b- Equalize the low frequency roll-off that adds unnecessary noise to the mix, and give presence on vocals. -
c- Use the compressor to even out vocal levels and make sure every word feels well. -
d- Add depth to the entry with the reverb. -
and- The addition of spatiality with the delay in sync with the bpm of the song using the Supertap.
The video is in English but is very simple and intuitive.
Plugins by Waves.
Tutorials: #4 Technique to equalize the kick (bass drum)
A very famous also called "The low end trick",
You can emphasize the low end of the sound, and at the same time make it more dry using the famous Eq Tube Tech, the "PE1C", also available as a Vst.
-
set Low Frequency on 30 or 60 hz
-
set Boost and Attenuator on the same value (see video)
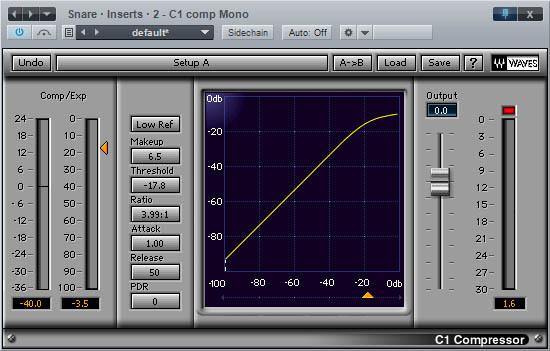
Tutorials: #5 How to use a compressor
- What is a compressor? The compressor works on the dynamic, which it is the difference between the strong and the quiet parts of a sound or of a passage of sound. The compressor automatically controls the volume levels based on some simple settings. Threshold (threshold) - the level where the audio input activates the compressor. Attack (attack) - the time taken for the compressor to start lowering the audio level with the ratio set. Relationship (ratio) - the amount of reduction of the level, for example 3: 1 that means that for every 3dB above the preset threshold sound it only passes 1dB; and finally the release (release) - that is the time taken by the compressor to stop the compression after the input signal level falls below the threshold level. - For what have been invented? When you record something or someone, for example, a solo voice, It is natural for some words be of much higher level than other. Sometimes this can be used to add emphasis but, sometimes, It can be completely random. This kind of variation in the levels can be a real headache when you're trying to mix a track. The compressor is basically an automatic volume control, lowering the level of stronger parts and therefore limiting the dynamic range, making life much easier carrying the entire collection in a more controlled and smooth mix. In a more modern context often we use the compressor to dynamic balancing on individual sounds as a case (kick), to give more attack or on the contrary more body. We may also use compressors on the mix buss, or drum buss to give ' glue ' to a group of sounds together and make them work in a more compact and cohesive, in questo tipo di utilizzo è anche molto facile eccedere e portare svantaggi anziche' benefici alla vostra musica.- When, where and why should I use a compressor? The dynamic is what makes the music a sound alive, by a weight to your beat, causes the music moves with a pace. So it's crucial to keep it. The compressor is a tool for the control of Dynamics, not to destroy it, so the end result is not ideal compressor crush everything and make a square wave. Si utilizza il compressore in molti modi diversi per controllare la dinamica, and to operate well on mix. - Using a compressor to help the beat to go out in the mix Say you have a kick not very incisive and you need to make it sound more effectively on the mix; one way to achieve this is by setting the attack long enough to allow all the transients of the champion to go through the compressor. Then we lower the threshold until the compressor starts to act on sound and simultaneously lower the time of the attack until we hear the sound of cash comes out the way you want. It is important to play with the setting of the attack while listening to the mix to see where you get the best balance of natural sound and the punch/click the compression, releasing it through the mix. Be careful not to overdo it and make it sound unnatural. - Using a compressor to materialize, and release to a sound We may also use a compressor to give body and release of a sound, If you set his attack a little shorter so that it works even on transients, resulting in greater dynamic range compression and reduction. This means that you can increase the gain (gain) and obtaining an average level (rms) higher. Then a short attack does work harder on the first peak ms, bringing it down and thus being able to emphasize subsequently the body and the tone of a sound. You could also try a short release time which will allow the compressor to quickly release the sound queue. For example, a hi-hat attack and release must be very brief. In the case of a snare drum attack and release will be slightly more, in the case of melodic instruments or synth will be even more and so on. Be careful to use the correct sound for each type of release, too short can lead to distortions, especially in the case of sounds with many low frequencies, how bass, sub, o kick. So use with caution and slight the threshold (threshold). example. If we have a battery that comes out too from the mix we can act on its peaks with a short attack and release so as to make it more even and less scratchy on the rest of the material.
- Release/Pumping The Good, the bad and the ugly We all love a bit of pumping (or at least we should do), then let's not forget one of the most important controls of the compressor, the release. If you set very short compressor will release the sound very quickly that can be good to add a bit of groove material, but you must always be careful about a few things: Unwanted artifacts: This is audible by pushing down / and then upwards in a non musical sound. This may be because it is squeezing too heavily and your release time is too short or long. If instead you have your attack and release too fast and the threshold too low it will have a sound distortion. Timing: This is very important. The pace of the action of the comp is out of sync with the time/bpm or the beat of your music and can compromise the energy and dynamics of performance. For example, if the compressor has not yet released after a peak, the transients that hit soon after will be drowned out then you need to work with the release time so that it is in time with the beat. Keep in mind that times will differ depending on the compression / threshold signal / input you have. A good trick is to keep an eye on the indicators (meters) the gain reduction. Each compressor has one of these to tell you how much actually is compressing, If you notice that the indicator never returns to 0 You can try a more rapid release threshold or not until it begins to oscillate between a 0 and not, in sync with the music. It's good to keep an eye on this tool, so you have a Visual idea if the compressor is in sync with the music in terms of timing, or not. Infinite Ratio: Some compressors offer a selection of compression ratio of up to Infinity:1. It means that she will not pass anything over the threshold at the time of attack set. This is basically the operation of limiter and can be used when you need to be a little more aggressive in controlling the dynamics and spikes or not to pass the signal 0 digital as in the case of the final rendering of mastering. - Compressione Buss Buss compression affects the dynamics of a mix of sounds, or track as a whole, to improve the collection of any song, and add ' glue ' and a touch of uniformity and cohesion in all material. Settings for a mixbus should be read at first, usually no more than 1-2 DB of gain reduction. The attack and release are crucial as always, and you should use a low ratio, 2:1. This ensures a non-invasive intervention to the mix, leaving it clean and dynamic, essential when it processes a whole bunch of different tools. In the case of a compressor in the master channel is generally important to set an attack not too quick and media releases in order to obtain a non-aggressive control over all the sounds and at the same time earn some db in rms, maintaining good dynamic. - Sidechain: Another feature that is very useful in a compressor's sidechain filter. For example, it uses so that the sub and low frequencies of your kick are filtered and not processed by your compressor so that it can work better on the body and click on the effect of the case and make it effective in the mix. Or that the signal from the channel of the kick serve as a trigger for the synth/sub channel that will be compressed only in sync with the champion of kick. In this way the sub and dynamic musical mix will coexist so kick, without merge with each other. - Parallel compression Also known as 'New York Compression'. One of the most interesting techniques to try if you like the sound that's coming from a compressor, but you will also want to keep the original uncompressed sound. This involves both the execution of compressed sound, some uncompressed signal by adjusting the levels of 2 channels depending on your taste and needs: - in this way, you can preserve some dynamics while maintaining heavy compression artifacts. This is often used on a mixbuss or the battery bus. So you can still make an impact very musical, Emphasizing more the tone, the presence and warmth.
Tutorials #6: how to mix the cash (kick / bass drum)
One of the most common mistakes you can make is to use the sample or sound wrong and then try to fix it in the mix. By far the most common is to play the kick stronger for groped to improve the groove. The reason for this common mistake is because there are many psychological and psycho-acoustic factors that come into play when an instrument sounds more ' sharp ' and seems sounds better at first glance. Have the kick too hard will play worse on all. The frequencies from 50 Hz up to 100-250 They are those where you keep vs kick or bass drum. The energy of the chest into the mix comes from having a good balance between the attack and the body, the sub and the depth of its sound. So it is better to choose a suitable sample to our song so do not miss too much time trying to make it sound good. This is done you can start to make it work with the bassline. Once the groove is impostatosi can proceed with the drafting of all the other instruments. The 909 and the 808 and how to get the best out of themThere is a reason why these old machines Roland I'm still always so popular: not because they were perfect, since there is a perfect sound in the music, but because they offer the basis for the creation of samples of kick. Note that I say the base, not the final product. The trick to getting the best out of a 909 or 808 It is to use one of his samples in layers with other samples kick! You will notice that even changed, compressing, and fx also with other sounds will always retain their energy on the dancefloor! Tip in KRL: "Check the sound of the kick on different systems - studio monitors, headphones, laptop, systems for clubs (if you get a chance). It's easy to make mistakes and mix them too loud. Sidechain of sub if the kick needs dynamic to come out. Give him a bit of eq medium to give it a nice round thud." Create the right space with the EQ
The best kick sounds are such because they were good equalized with the rest of the mix, and not because they were pumped up by volume above everything else. Figure out where the frequencies of its low resides, of the Medes and its click and reduce them in the rest of the mix through a good eq will help to create the right space and compensate all. Instantly feel the actual benefits and the character of his sound in a mix clean, where the frequencies do not clash with each other and where each tool has its place in the spectrum of frequencies. Kinda like when inside a closet put everything in its proper and practical place and not one above the other. Once you've found the right balance and a groove flowing well, try to further lower the kick some db and devise some more the eq in the rest of the mix. If you hear sounds even better then you had pushed the cashier even too strong. Then a little boost of around 90/110 Hz will give him some ' thump ', If necessary. You can even try to nudge his pitch and feel if the enhances better or does it mix with the rest. Sampling, Layering and other techniques to a kick only! example: take 2 different kick samples: a full-bodied as the 909 e uno piu' squillante e funky come quello della disco. Put them in parallel and using the eq remove low to the disco one and the high at 909. In questo modo avrete una kick sia profonda nelle basse che con un bel click e delle belle medio-alte sopra. Se necessario usate anche il pitch per intonarle meglio tra loro e regolate nell'inviluppo di ognuna il tempo di attacco e decay per evitare controfasi e che si annullino tra loro i suoni. Maybe you prefer as attacking one of 2, But how do the other extension: reduce the decay on the front and blunt the attack on the second. Give him the proper compression to both, a little saturation to give it color and you're already well under way. Always follow your ear, There are no fixed rules.
Remember that the most important thing in the end is always the arrangement of the different parts that make up the song. I heard kick samples that sounded ridiculous alone but perfect in the mix! If you hear a sound in your song doesn't come out as you wish, After trying to work better on it, probably means that something in the mix pulling against him. If for example your bass drum doesn't sound like you would the fault could be also the bassline. Try to fix it or change samples or notes which compose it.
For all these reasons, listening is critical, sonorizzate bene lo studio e usate sempre degli ottimi monitors. Good luck with your work!
Tutorials: #6 Sequencer choice
-Programs to make music Choosing the right program to create music that, may 'seem difficult, sometimes frustrating. There are many more 'or less complex programs, more 'or less professional, and we are often taken from the rush of wanting to start making music and get their hands dirty, but we do not know what program and how to use it! You will find below the list of the best SEQUENCERS. -WHAT IT IS AND WHAT IT IS USED FOR A SEQUENCER? The sequencer is the basis of all computer music! It is no more than the actual program for PC, mac or linux used to create music. The term DAW instead, Digital Audio Workstation, It means a computer dedicated to audio management. The sequencer allows you to record audio, to create sounds from scratch, mixing different tracks and create a canzonecompleta. It allows you to manage, recording and processing, audio and MIDI data, in order to finalize an audio track.the sequencer will use inside the plugins, that will allow us to create and effettare sounds (VSTfx). We can also connect a MIDI keyboard that will allow us to manually play our virtual synthesizer, which it is then a virtual instrument (VSTi). An audio editor (sampler) invece ci permette di lavorare su file audio (samples) gia' pronti (to mp3 or wave for example). An external tool (for example guitar) It can 'be used by connecting a sequencer to the sound card. Then exporting to wav (goes from) then we can do what we want the final file, as a professional mastering, nei use dj sets, propose it to a record company. -Which sequencer choose obviously, choose a sequencer is not easy. There is no absolute best sequencer, but there is a sequencer with which you are better and that people have grown accustomed to using. Note that some producers use different world famous sequencer. It 'so easy to understand that a good track makes the artist, not the sequencer. Below we offer some of the most 'famous sequencer: Image-Line FL-Studio: the most popular with beginners Price: 95$ - 700$ a seconda della versione PC e MAC
Fl Studio Evolution of old Fruity Loop, FL Studio retains the setting based on the creation of electronic music, although of course it can be used to create music of other genres. The sound management is original than the other sequencer (simplistic view of the structure of the step sequencer blocks) and the mixer insert which manages channels and effect. This program is also characterized by an affordable price and excellent sales strategy: buy it now and you will have lifetime access to all updates! Probably that's why behind Fl Studio is an international community of producers very active, including many famous manufacturers of electronic music, although some people consider only a toy, accustomed to other sequencers. Anyway, some of the best plugins are sold separately, and wanting them to buy all the final price can 'go up to 700$. -------------------------------------- Steinberg Cubase - a revolutionary sequencer Price: from € 100 to € 600 PC and Mac
Among the special features we can mention the interesting Cubase Control Room section of the mixer (useful for recording different instruments), the automations managed by VSTexpression standards, and the old wave-midi editor. In short it is a sequencer "old school", that lends itself to use a purely Shot, versatile for the creation of each musical style. Between the sides so to 'say negative, Cubase lacks an integrated package VSTi noteworthy, despite the efforts of Steinberg. -------------------------------------- Ableton Live - Also a sequencer for dj Price: from € 80 to € 650, depending on the version Mac and PC
Live was a revolution when it came out, He led out of the studio sequencer, to do so enter the world of live music (hence its name live). In a short time Live has become one of the most beloved sequencer from DJs and producers of electronic music that they use during their evenings either in studio, alone or as an addition to the own setup for events. Its main advantage? His two visual structure that allows you to compose and arrange a song in real time, but also the integration of Max For Live, a package of effects and instruments created in cooperation with MaxMSP and especially designed to improve the functionality of the software: in short words, It allows you to change how the tools and hardware interact with Live, as well as creating new sounds and effects. Another significant advantage is that you can find many controllers (Akai, Novation just to name a few) and iPad applications dedicated to Live. Its disadvantage? A strong predisposition to the rhythms and musical styles let 'say "binary": we say that is not the best program to write music orchestra or jazz. ---------------------------------------- Apple Logic Pro - only for Mac Price: $180 Mac
After being bought by Apple (Logic that sells at a very low price for the market to do more Mac computers), Logic has become one of the sequencer with the best quality / price ratio provided that you have a Mac and you have the patience to wait for updates, which do not occur regularly. Its advantages? Detailed control of audio / MIDI setup very complex, the Mainstage section for live performances and recordings, various quality plugin. Moving on to the disadvantages: an uncertain future, vision caused by both updates that do not occur consistently, is seeing what happened to Garageband Pro or iLogic that over time have lost several of their basic characteristics. ----------------------------------------------- Reaper - convenient, nearly free Price: from € 46 to € 172, depending on the version Mac and PC
Reaper Developed by the authors of Winamp and Gnutella networks, It is not only one of the cheapest sequencer on the market, and also (and especially) sequencer with more customization options in terms of graphics and interface characteristics. He has had a very active community and many modules, skin and added to meet the needs and tastes of each user. There are all the basic functions of a sequencer that respects and includes Reaplugs package. Furthermore, its sound management system is very versatile: for example audio and MIDI can coexist in a single track. Some users will miss the score editor (the pentagram where to enter musical notes) and a bit 'of virtual instruments, In addition to the complex issue could confuse newbies, but all these disadvantages are offset by a great price and an honest sales strategy: you can use a full demo of all the features and without any time limits. Furthermore, regardless of the purchased license, the program always offers the same functions. The difference lies only in the commitment moral user, depending on the use: if you use Reaper for professional projects, you'll be required to pay $250. Se sei a beginner, solo $60. E l'usage during demo, the developers have implemented a small pop up that encourages you purchase the product. ---------------------------------------------- Propellerhead Reason - all in one Reason Price: from € 120 to € 400, depending on the version Mac and PC
Reason deserves the nickname "virtual studio", after being merged with the recording software Record, and having its own format for managing plugins. The VST are not in fact supported by Reason, the only way to use them is to rewire. The graphical interface is powerful in terms of routing audio and midi, but it might discourage users who have never worked with hardware interfaces or annoy anyone who thinks in a sequencer should not be "cables" graphics to connect various tools. The software has a very active community, in English, mainly devoted to electronic music. tutorials on sequencers taken up and adapted by Musicadigitale.net ----------------------------------------------
Tutorial #7: 121 Mastering tips from experts
Tips from Dirty Drop at #94 of the guide, enjoy the tutorial! https://audioskills.com/tips/mastering/
tutorials useful links:
Tube Tech studio tips
Waves studio tips
Musicadigitale.net

